
When operated properly, and according to the rules, the water trampoline is a safe and a fun form of entertainment that will thrill participants at any age. It is imperative that the participants understand and follow the rules. When operating and taking care of your water amusement device.
Thank you for purchasing a new inflatable water trampoline from Aquanaut Pro! If you have purchased from us before, then you know that our products are manufactured to the best possible standards available for dependability and durability. It is very important that you read these instructions in its entirety before setting up and operating your new water inflatable.
These instructions will explain how to set up water inflatable, choose your water location and how to repack your inflatable trampoline at the end of the season. It will also explain some good general information that will be helpful in numerous situations.
If you read these instructions and have some useful suggestions, please feel free to contact us at www.watertrampolinesexpress.com or call us at 1-704-900- 0083.
In This Article
- Upon Arrival / Inspection
- Prepare for Anchoring
- Safety and Operation
- Cleaning and Care Tips
- Deflation
- Storage
- Seasonal Maintenance & Off-Season Storage
Upon Arrival/Inspection
We take great care in packaging our products for shipment; however, there are times when items may be damaged in transit. This is true in any industry.
Please take a few moments to inspect the inflatable and accessories upon arrival for damage from transport. If there is damage, you will need to contact the shipper to file a claim. Please feel free to call our office or email us for assistance in the event you need to file a claim.
Water Trampolines Express is not responsible for damage incurred in shipping products to the customer. We understand that time is of the essence in damage claims and we will work diligently to help you solve any situations that may arise.
1) Layout and Inflation
Position yourself on the water shore line. Bring with you all the components in the boxes. You can do this on the grass or sand. Once inflated, it will be easy to move to the water. There are handles around the out- side bottom of the ring to carry it or you can carefully drag it!
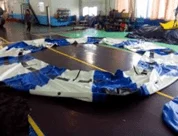
On each inflatable is a Grey plastic screw valve. The main trampoline ring has three inflated compartments. Each having its own valve. Locate the valve, remove the screw cap and hook up the pump, one valve at a time, using the adapter which twists and locks. Inflating will take a few extra moments. The small slide and the log can be inflated to a firm feeling with the hand. The blob is a wide bag is inflated only to 70%. It should be loose and “sloppy” this will allow for a good launch. (explained later in using the inflatable).
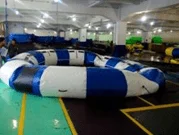
More importantly, when inflating the three chambers in the MAIN RING, only fill each chamber (3) to about 80-90% until ALL chambers are inflated. Once each Chamber is inflated to 80-90%, you can then return to each chamber valve to “top up” to a firm 100%. Do not overfill. Better to be a little under inflated if not sure.
2 ) Installing
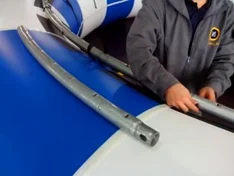
Take the curve steel pipes and place on top of the tube around the perimeter with little holes upwards. You will start to slip each tube into the strap loops, one at a time, on the inside perimeter of the tube. Once each slide tube is in its loop, then insert second tube and join with the nut provided. Do this for each tube one at a time until completing the full circle. Then walk around and tighten the straps to create a firm hold onto the steel ring. It should be firm in its place.
3) Install fabric and springs
Place springs in bundles of 10-12 pc around the perimeter of the ring as in picture. Then place the Fabric in the center of the tube. Start hooking springs to the frame and fabric D-rings. Progress with every 10th D- ring and hook a spring between the ring and Fabric. Once fabric is installed by every tenth D-ring, you can start to fill in the other D-rings at any rate desired. This method insures a even and simple placement. When installing the last springs, you will have to stretch the springs. A pull hook is provided.
4) Attach the components
Attach the circular pad overtop of the Springs. Center up by your eye, then underneath you will see some webbing. Just take the webbing and secure to one of the springs. Tie a tight bow (not a knot) so it will not come free, but easy to dis- mantle when deflating the unit!
Now the Trampoline is ready to bounce on safely. It can be used on the land or in the water! But if you desire to add the other play components, you can do it now, or later, when in the water!
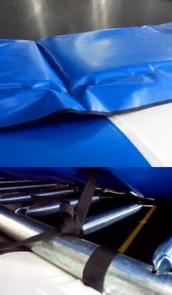
To add a play component, just move the component next to the trampoline. See the pictures to match up the component to the proper space on the Trampoline!
The blob and log will position themselves by floating on the water. The slide is leaned up against the top edge of the trampoline. Unnent are some D-Rings. The D-Rings are meant to be downward. Using the sup- plied Webbing, slip it through a D-Ring on the component and around and through a D-Ring on the Trampoline. Then tighten accordingly to snug up the component against the Trampoline! Once all the components are attached, the unit may be dragged into the water. You are now ready to prepare for anchoring.
Prepare for anchoring
Before you enter the water with the trampoline, choose an ideal location to place your Trampoline. Your trampoline should be place in water having a depth of at least 8 ft minimum and positioned at least 30ft from any docks or boats.
You will need to take you concrete weight, at least 200lbs or use a steel stake at least 3 ft long to drive into the sea bed.Take the trampoline, and position yourself in 3 ft deep water along the beach. Take the rope, and divide into three long pieces. Wade into the water and go under the trampoline up into the middle. In the middle near the water line you will see three D-Rings.
Tie each end of the rope very tightly with knots to secure the rope to D- Rings!
Bring the three ends of the rope together and tie into the steel clasp. Or you may crisscross the rope into the clasp and tie of at the opposite D- Ring on the Trampoline. So basically you have a three point tie off going down to one central anchor point in the sea bed.
You may have to do some calculating for distance of rope down to the depth of your central anchor point. Take a 4th piece of rope with you and be ready, underwater to tie off your clasp to the anchor tie off. This rope should be doubled and ready to take up any slack that is present. It may be an advantage to have two people to go underwater to do this job.
There may be a little balancing act between you two to get this tie of very securely. If in doubt, tie another know. You don’t want your trampoline drifting away at night.
One this procedure is done then you can see the clasp has a cotter pin that for easier removal out of the water you can know unhook the main anchor point form the trampoline with the removal of the cotter pin! Please do your due diligence here as this will stop your trampoline from floating away. Anything else you may think of to anchor
Safety and Operation
This product should never be used by children except when supervised by an Adult. For Ages 5 and up. This product is not a personal flotation device.
- Always wear a flotation vest as may be required by your local authorities.
- Never use the trampoline without the spring cover pad secured.
- Never place your hands or feet through the handles or into the springs.
- Do not use in Shallow water less than 8ft. (2.4m) deep.
- Do not use within 25 feet of shore, docks, pilings or other hard objects.
- Never swim under the product.
- Do not jump or dive from this product.
- Do not use while under the influence of alcohol or drugs.
- Do not attempt flips, somersaults or acrobatic man oeuvres on this product.
- Do not use on land or in swimming pools.
- Do not tow this product behind boat or personal watercraft.
- Inspect this product regularly before using and re- place worn, defective and any missing parts.
Cleaning and Care Tips
- Do not use M. E. K. (Methyl Ethyl Ketone) to clean your inflatable, as this will damage the vinyl.
- Do not use chlorine based cleaner or bleach to clean, as this may damage the material. Never use petroleum-based or vegetable oil-based soaps or cleansers. These will leave behind a slippery residue, and can possibly damage the trampoline tube.
- Keep your inflatable looking like new by frequently wiping soiled areas using a mild cleaner (such as Simple Green or Amour-All). Never soak the inflatable as mildew may form that will void the warranty!
- Do not pack up your inflatable when wet! Moisture can cause mildew which will void your warranty and cause a break down in the performance of the vinyl fabric.
- If you must pack unit when damp or wet, make sure to set up again within 5 days to air dry. The water trampoline frame should always be thoroughly washed before storage.
Deflation
Allow your water trampoline tube to dry completely before beginning deflation. While drying, your steel frame can be disassembled and put into a storage container as well. If you have the space, or do not want to take the time to reassemble the frame for every use, simply lean the frame against the wall of your garage or storage shed and cover it with a tarp or a sheet to protect it.
Once the water trampoline tube has dried, you can begin deflating it. If you own an electric air pump, you should also be able to use it for deflation. When deflating your water trampoline tube, make sure your air pump accessories are properly attached and in full working order.
Storage
When your Rave water trampoline tube has been cleaned, dried, and deflated, roll it loosely and place it in a large storage container. Preferably, the container should be both vented and secure from rodents.
You can use a large plastic storage container, such as a Rubbermaid container for your water trampoline tube. And your accessories. Again remember, everything must be perfectly dried out first!
Seasonal Maintenance, Anchoring, and Off-Season Storage Best Practices
Following the setup and safety rules above will keep participants safe day-to-day, but the equipment’s long-term lifespan depends heavily on how it’s anchored during the season and stored once the season ends.
Anchoring for Changing Weather Conditions
A water trampoline’s anchoring system needs periodic attention throughout the season, not just at initial setup: check anchor lines and connection points weekly for fraying, UV degradation, or loosened hardware, and always add extra anchor points before forecasted storms or high-wind days rather than relying on standard anchoring alone. Anchors should be positioned to account for changing water levels — a line taut in calm, high water can become dangerously slack or overstressed as levels shift, so recheck tension whenever water depth changes noticeably.
Routine Cleaning to Prevent Fabric Degradation
Algae, mineral deposits, and bird waste left on the platform surface accelerate UV and material breakdown if not cleaned regularly. Rinse the platform with fresh water every 1-2 weeks during active use, and use a mild, non-abrasive cleaner formulated for PVC or reinforced fabric — harsh detergents and pressure washers can degrade seams and coatings faster than normal sun exposure would on its own.
End-of-Season Deflation and Drying
Before storage, fully deflate the unit gradually rather than all at once, allowing trapped water and moisture to drain from seams and valves as pressure releases. Never fold or roll the trampoline while it’s still damp: residual moisture trapped in folds is one of the leading causes of mildew and material weakening over winter storage, so allow a full dry-out period of at least 24-48 hours in a shaded, ventilated area before packing it away.
Proper Off-Season Storage
Store the deflated unit in a cool, dry location away from direct sunlight and away from rodents or sharp debris that could puncture stored fabric — a storage bag or bin elevated off a concrete floor is ideal. Avoid stacking heavy items on top of the folded trampoline, since sustained pressure on folded seams can create weak points that only become apparent the following season when the unit is re-inflated. Anchors, ropes, and hardware should be cleaned, dried, and stored separately to prevent rust or line degradation from affecting the main unit.
For setup and safety guidance that pairs with this maintenance routine, revisit the instructions above, and if you’re outfitting a broader waterfront setup, browse complementary platforms and accessories in our shop. Operators managing multiple water sports activities on the same waterfront should also review our guide to common water sports dangers to keep the whole area safe.
Frequently Asked Questions About Water Trampoline Maintenance
How often should I check the anchor lines on my water trampoline?
Check anchor lines and connection points weekly for fraying or loosened hardware, and add extra anchor points before forecasted storms or high-wind days.
How often should I clean my water trampoline?
Rinse the platform with fresh water every 1-2 weeks during active use with a mild, non-abrasive cleaner formulated for PVC or reinforced fabric.
Can I fold and store my water trampoline while it’s still damp?
No — residual moisture trapped in folds is a leading cause of mildew and material weakening, so allow at least 24-48 hours of drying in a shaded, ventilated area before packing it away.
Where should a water trampoline be stored during the off-season?
Store the deflated unit in a cool, dry location away from direct sunlight, rodents, and sharp debris, ideally elevated off a concrete floor and without heavy items stacked on top.