Dropping a massive concrete block into the water might feel like the ultimate security measure, but relying on static weight alone is often the quickest way to strain your equipment and tear through reinforced D-rings. You’ve curated a high-end maritime escape for social connection and freedom; the last thing you want is the constant anxiety of drifting away or damaging your premium investment. It’s a common struggle to balance the desire for a rock-solid social hub with the technical reality of wind and currents.
This guide teaches you exactly how to anchor a floating island in a lake using modern principles of dynamic tension to ensure a stable, exclusive retreat. We will explore the sophisticated gear needed for various lake conditions, the precise anchor weights required for maximum stability, and the meticulous care steps that protect the longevity of your inflatable deck or cabana boat. Prepare to master the art of the perfect setup so you can focus entirely on the prestige and joy of your next lakeside gathering.
Key Takeaways
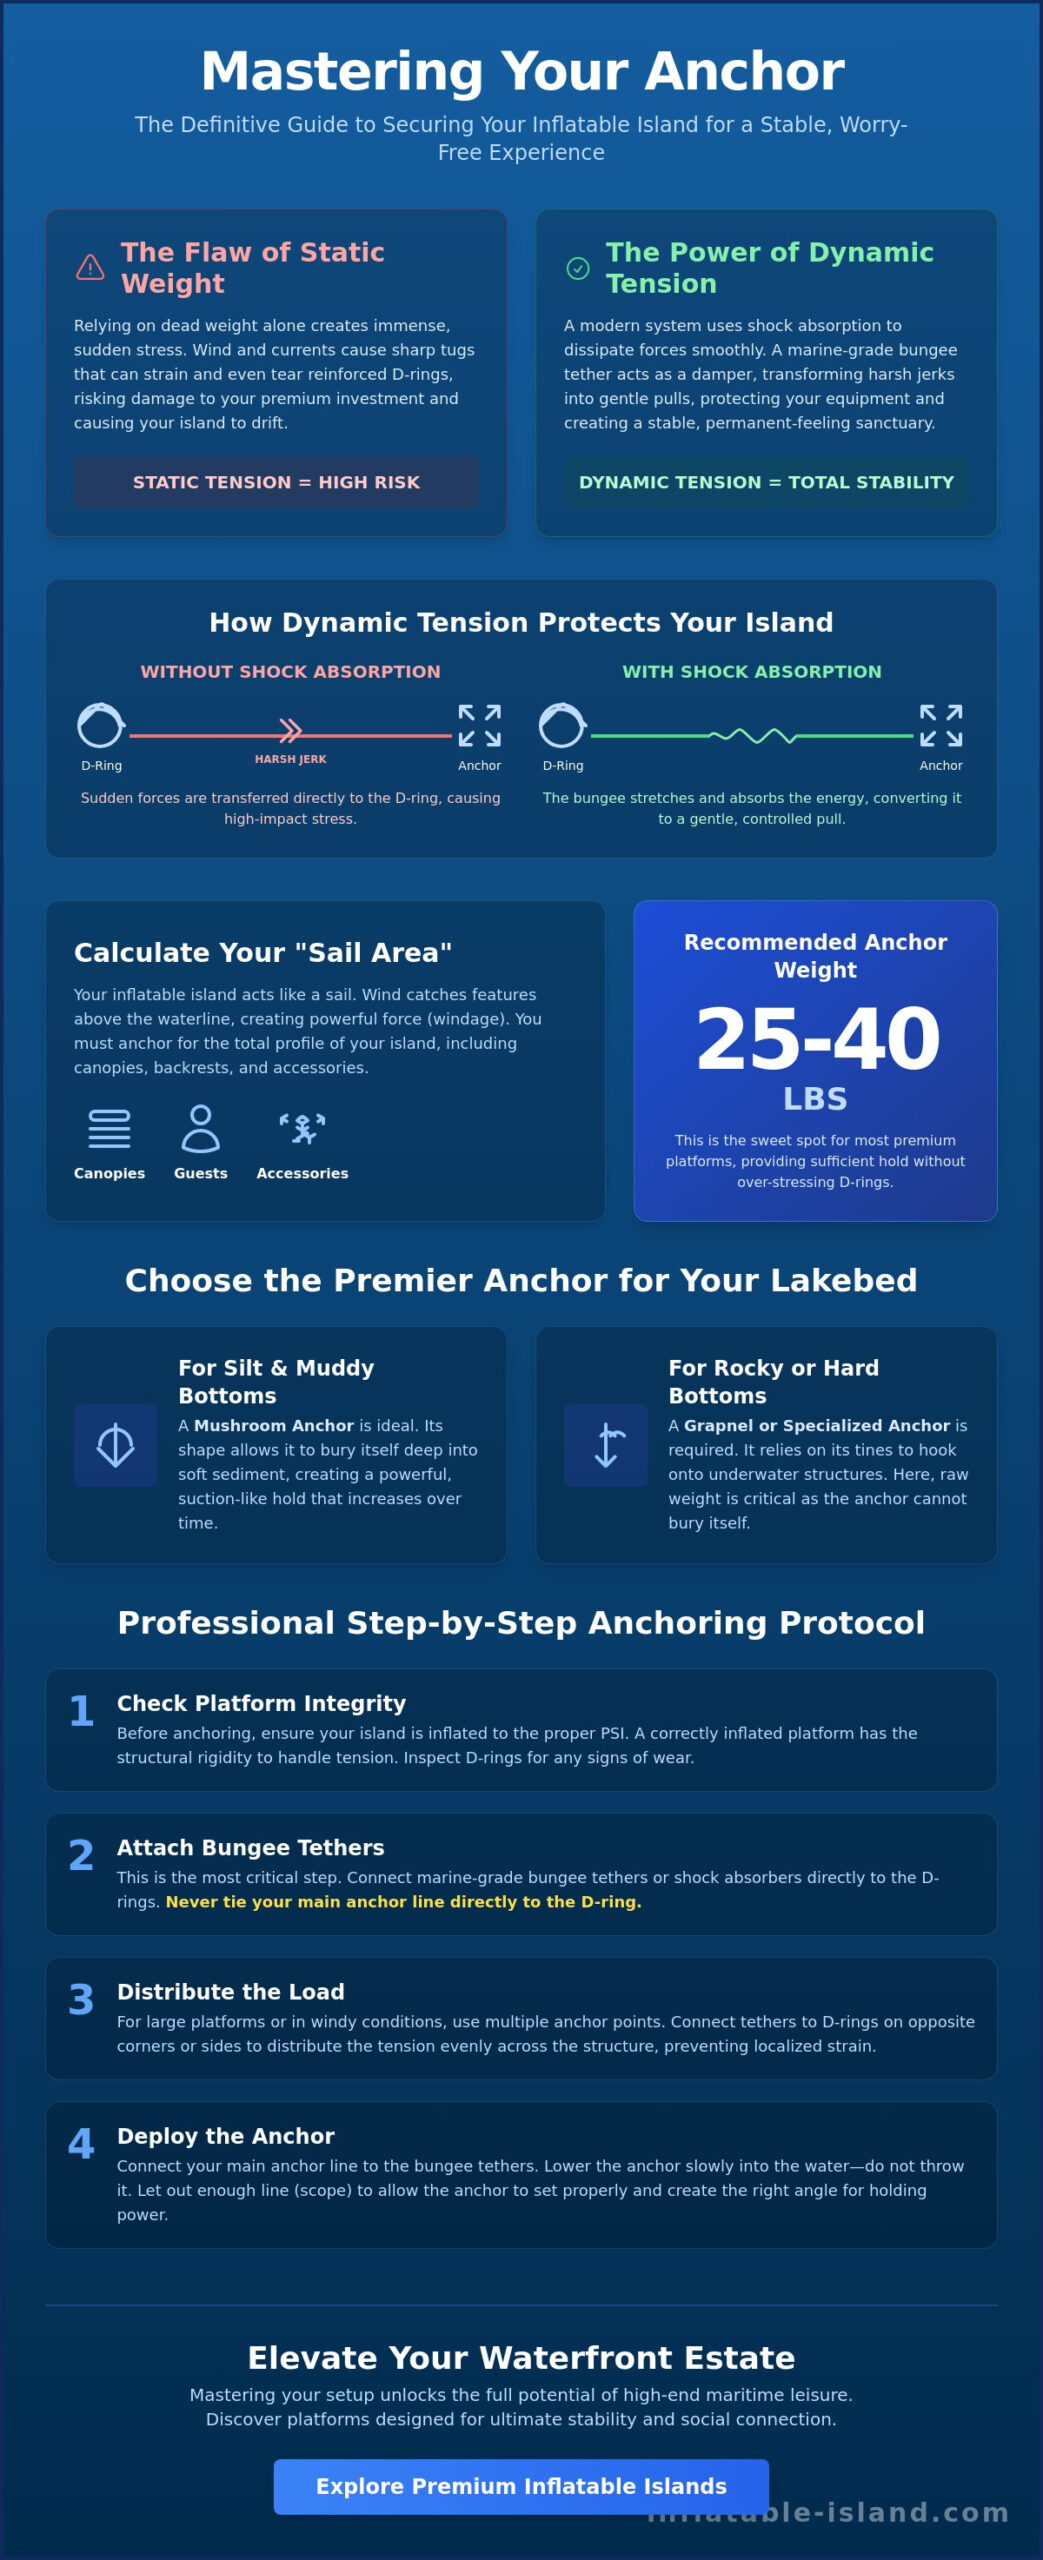
- Master the principles of dynamic tension and shock absorption to transform your Inflatable Floating Deck into a stable, permanent-feeling sanctuary regardless of the current.
- Discover how to calculate your island’s “Sail Area” to counteract wind resistance, ensuring your luxury cabana stays exactly where you intended for all-day relaxation.
- Identify the premier anchor choice for your specific lakebed, from mushroom anchors for silt to specialized options for rocky terrain, to guarantee a rock-solid hold.
- Follow our professional step-by-step protocol on how to anchor a floating island in a lake, including the vital use of marine-grade bungee tethers to protect your D-rings.
- Learn the crucial role of proper PSI levels and reinforced attachment points in preserving the structural integrity and longevity of your high-end maritime investment.
Why Proper Anchoring is Vital for Your Floating Island Experience
Secure your sanctuary. Your Inflatable Floating Party Island Cabana Boat is a masterpiece of modern leisure, designed to be the definitive centerpiece of your lakeside excursions. To truly unlock its potential, you must view anchoring as a technical discipline rather than an afterthought. A complete system is a synergy of weight, line, and shock absorption. Mastering how to anchor a floating island in a lake ensures your premium retreat remains a reliable social hub where guests can gather, lounge, and celebrate without the disruption of drifting. Without a rock-solid hold, your private island becomes a liability, subject to the whims of the wind and the unpredictability of the water.
Establish a fixed destination. A secure anchor maintains the “social hub” position, ensuring your platform is always accessible to swimmers and visiting watercraft. This stability is what transforms a simple float into a high-end maritime estate. It prevents accidental collisions with docks, expensive boats, or shallow hazards that could ruin a perfect afternoon. When the island stays put, the luxury experience begins.
Protecting Your Premium Inflatable Investment
Protect your investment with precision. High-quality Inflatable Floating Decks are built for durability, yet they require thoughtful handling to ensure longevity. Distribute tension across multiple D-rings to avoid localized strain and “rope burn” on the heavy-duty vinyl. A drifting island often ends its journey against shoreline debris, where jagged rocks or submerged timber can cause devastating punctures. Beyond physical protection, keeping your island in a fixed position allows you to control its orientation. This helps you manage UV exposure and ensures your canopy provides the precise, cooling shade you need throughout the peak hours of the afternoon.
Safety and Peace of Mind for Social Gatherings
Prioritize the safety of your circle. On a busy lake, a drifting platform is a hazard to both your guests and other boaters. Maintaining a safe distance from motorized traffic lanes is essential for a calm, exclusive atmosphere. Inflatables are naturally buoyant and catch the wind easily, creating a powerful “sail effect.” A sudden summer gust can pull an improperly secured island hundreds of yards in minutes. By consulting sources on different types of anchors, you can select a weight and design that bites into the lakebed, providing the peace of mind required for a truly worry-free social experience. Learning how to anchor a floating island in a lake is the ultimate skill for any host who values the safety of their guests and the prestige of their equipment.
Understanding Windage and Anchor Weight for Inflatables
Mastering the physics of the water is the first step toward true maritime freedom. Unlike a traditional vessel that displaces water to find its footing, an inflatable island rests elegantly on the surface, making it uniquely vulnerable to the invisible forces of the breeze. This high volume combined with low relative weight creates significant wind resistance, a phenomenon known as windage. When you’re learning how to anchor a floating island in a lake, you must first calculate your “Sail Area.” This includes everything above the waterline, from the tall backrests of your lounge to the expansive canopy of a luxury cabana. These features, while essential for comfort, act as a literal sail that catches every passing gust.
Mass is your primary defense against movement. While a small personal float might stay put with a light weight, large-scale social platforms require more authority. For most premium setups, 25 to 40 lbs is the definitive sweet spot for anchor mass. This weight provides enough gravity to keep the island stationary without putting excessive stress on the reinforced D-rings. Your specific requirement will fluctuate based on the lake bottom; a soft, silty floor allows an anchor to “set” or bury itself, whereas a hard, rocky bottom relies entirely on the raw weight of the metal to hold your position. If you’re looking for a platform designed to handle these forces with grace, exploring a high-performance inflatable island can provide the structural integrity needed for a truly stable experience.
The Role of Anchor Scope and Line Length
Precision in your rigging is just as vital as the weight at the end of the line. Scope refers to the ratio of your rope length to the actual depth of the water. To ensure your anchor digs in rather than lifting, aim for a 3:1 ratio in calm conditions or a 5:1 ratio if the weather turns. This extra length creates a horizontal pull that helps the anchor bite into the lakebed. For those seeking technical mastery, calculating the correct scope is essential for absorbing wave energy and preventing the anchor from dragging. Always opt for nylon ropes; their natural elasticity acts as a built-in shock absorber, gently taming the energy of the waves before it reaches your island.
Managing the Sail Effect of Cabana Tops
Adapt your strategy as the environment shifts. Removable mesh tops and sun canopies provide elite comfort, but they also drastically increase your anchoring requirements. When the wind picks up, consider orienting your island so the smallest profile faces the prevailing breeze. It’s a scientific reality that doubling the wind speed increases the effective pull on an inflatable by fourfold. By understanding these dynamics, you can maintain your exclusive retreat’s position, ensuring your afternoon of social connection remains undisturbed by the elements.
Choosing the Best Anchor Type for Lake Bottoms
Select the right tool for the terrain. While the physics of windage and scope dictate your system’s requirements, the geology of the lake floor determines which anchor will actually hold. Choosing the wrong hardware can result in a frustrating day of dragging or, worse, permanent damage to your equipment. When considering how to anchor a floating island in a lake, you must evaluate whether you’re resting on soft silt, dense mud, or jagged rock.
Mushroom anchors are the undisputed gold standard for soft lakebeds. Their rounded, bowl-like shape allows them to settle into the sediment, creating a powerful suction cup effect that resists vertical and horizontal pull. This design is exceptionally gentle on your PVC, as there are no sharp edges to snag. In contrast, avoid the common mistake of using heavy cinder blocks. These are abrasive and prone to chipping; a single sharp edge can easily slice through a reinforced D-ring or the island’s hull during transport or retrieval. Protecting your investment starts with choosing equipment designed for the water.
Mushroom vs. Grapnel: Which is Right for You?
Grapnel anchors offer a different kind of sophistication for the adventurous explorer. Featuring four or more folding tines, they’re designed to hook onto submerged rocks or heavy weed beds where a mushroom anchor would simply slide. They are incredibly portable, folding into a compact profile that fits perfectly in a storage locker. However, they require a “trip line” when used in rocky areas to ensure you can retrieve the anchor if it becomes wedged. For most weekend excursions, the mushroom anchor provides superior holding power in mud, while the grapnel is your tactical choice for rugged, unrefined environments.
Portable Sandbag Solutions
For those who value agility and eco-conscious recreation, sandbag anchors are a transformative solution. These heavy-duty PVC bags are designed to be filled with local lake stones or sand upon arrival, eliminating the need to haul heavy metal weights across the dock. This “zero-profile” approach is perfect for lake floats for adults, as the soft exterior of the bag won’t scratch or dent your platform during a busy social gathering. To ensure maximum security, use a marine-grade tether and double-seal the bag to prevent sediment from leaking. This method provides a sophisticated, lightweight way to master how to anchor a floating island in a lake without sacrificing the stability or style of your private retreat.
Step-by-Step Guide to Anchoring Your Floating Cabana
Precision is the hallmark of a seasoned mariner. Transitioning from the technical theory of weights to physical deployment requires a methodical approach to ensure your sanctuary remains exactly where you place it. Before you even touch the water, inflate your platform to its recommended PSI. A fully pressurized island provides the rigid structure necessary to handle the dynamic tension of an anchor line without buckling. If you’re wondering how to anchor a floating island in a lake with professional results, the secret lies in the inflation level; a soft island is a drifting island.
Secure your equipment against the forces of nature. Attach a marine-grade bungee tether to your primary D-ring to serve as a high-performance shock absorber. This vital addition prevents the jarring “jerking” motion that occurs when waves hit, protecting your reinforced stitching from unnecessary fatigue. Unlike basic ropes that transmit every ounce of energy directly to the PVC, a bungee dissipates the force, maintaining a calm environment on board while extending the life of your investment.
Preparing the Connection Points
Excellence is found in the details. Inspect every D-ring for reinforced stitching before you begin your deployment. For larger models, utilize a “bridle” setup by connecting your anchor line to two separate points on the inflatable floating island. This distributes the load evenly, reducing the stress on any single attachment point. If your rope path crosses the inflatable tubes, apply a protective sleeve or a soft cloth buffer to eliminate the risk of rope burn or surface abrasion during long days on the water.
Setting the Anchor and Testing Stability
Execute your drop with tactical intent. Position your island upwind of your desired final resting spot and lower the anchor slowly. Once you feel the distinct “thud” of the weight hitting the lakebed, feed out the appropriate scope of line to allow for a secure hold. Knowing how to anchor a floating island in a lake involves more than just dropping weight; you must cleat the line off with a reliable knot like the Bowline or Clove Hitch to ensure it remains taut.
Perform a “set test” by gently pushing the island away from the anchor to ensure it has bitten into the sediment. Throughout the day, keep an eye on rising or falling lake levels. A sudden drop in water depth can create slack in your line, while a rise can put undue pressure on your D-rings, requiring a quick adjustment to your scope. Ready to upgrade your weekend? Explore our premium Inflatable Floating Party Island Cabana Boat collection to find your next waterfront centerpiece.
Elevating Your Waterfront with Inflatable Islands Co. Platforms
Elevate your expectations of waterfront leisure. While mastering how to anchor a floating island in a lake provides the technical foundation for a secure day, the hardware you choose defines the quality of your experience. At Inflatable Islands Co., our designs transcend the category of simple floats to become sophisticated, high-performance maritime estates. We prioritize reinforced anchoring points that are engineered to withstand the dynamic tension discussed in previous sections, ensuring that your social hub remains steadfast and secure even when the lake conditions shift. These attachment points are integrated into the core structure of our platforms, providing the confidence you need to host exclusive gatherings without compromise.
Durability meets meticulous craftsmanship. Every inflatable island in our collection is crafted from premium, commercial-grade materials designed to resist UV degradation and physical abrasion. This commitment to quality ensures that your investment retains its prestige and performance season after season. Our floating decks offer unparalleled versatility, serving as a stable docking station for jet skis or a sprawling lounge for sun-drenched afternoons. By joining our community of luxury lakefront owners, you are choosing a lifestyle defined by movement, connection, and the freedom of a personal retreat.
Designed for Stability and Socializing
Stability is the cornerstone of luxury. Our platforms utilize wide-beam construction to significantly reduce tipping, providing a rock-solid feel even in choppy lake water. This engineering allows guests to move freely, whether they are stepping from a boat or lounging with a cocktail. Integrated features like built-in coolers and specialized seating transform these islands into the ultimate social hub for family and friends. Despite their expansive size when deployed, these platforms offer remarkable ease of transport. You can move from your vehicle to the water in minutes, making spontaneous adventures a reality for the modern explorer.
Seamless Integration with Luxury Accessories
Customize your maritime experience. Your setup can be further enhanced by pairing your island with our specialized inflatable cabana boat accessories, ranging from high-efficiency solar-ready systems to custom canopy shades. For those who enjoy hosting larger groups, our custom tethering options allow you to connect multiple decks or islands into a massive, interconnected floating complex. This modular approach ensures your waterfront setup can grow with your social circle. If you are ready to redefine your summer, Explore our full range of premium inflatable watercraft today and discover the difference that elite engineering makes in how to anchor a floating island in a lake successfully.
Command the Water with Unrivaled Stability
Mastering the art of the perfect set transforms your waterfront from a simple shoreline into an exclusive, high-performance retreat. You now understand that securing your position is a balance of calculating windage, selecting the ideal mushroom or grapnel anchor for the terrain, and utilizing shock-absorbing bungees to protect your investment. By following these professional protocols for how to anchor a floating island in a lake, you ensure every social gathering is defined by calm, prestige, and total peace of mind. Your private island stays exactly where the adventure begins.
Don’t settle for anything less than maritime excellence. Our platforms are engineered with commercial-grade 0.9mm PVC construction and feature reinforced stainless steel D-rings to handle the most demanding lake conditions with ease. It’s time to join a community that values both technical innovation and sensory luxury. Upgrade your lake days with an Inflatable Islands Co. Cabana Boat and start experiencing the freedom of a truly stable, aspirational social hub. The water is calling; answer it with the confidence of a master mariner.
Frequently Asked Questions
How much weight do I need to anchor a 10-person floating island?
Aim for a minimum of 35 to 50 lbs to secure a large-scale social platform. Because a 10-person island features significant surface area, it acts as a powerful sail in the wind. Using a heavy-duty mushroom anchor ensures the weight stays set in the lakebed, providing the stability required for a luxury group experience without the risk of drifting into boat channels.
Can I use a cinder block as an anchor for my inflatable?
No, you should avoid cinder blocks because their abrasive surfaces and sharp edges can easily slice through premium PVC. While they are inexpensive, the risk of “rope burn” or a catastrophic puncture to your private retreat is too high. Opt for a vinyl-coated mushroom anchor or a dedicated sandbag solution to protect your investment while maintaining a sophisticated lakeside aesthetic.
What is the best rope to use for anchoring an inflatable in a lake?
Marine-grade nylon rope is the premier choice for securing your floating deck. Nylon is naturally elastic, allowing it to stretch and act as a built-in shock absorber when waves hit your platform. This elasticity is vital for how to anchor a floating island in a lake successfully, as it prevents the anchor from being yanked out of the sediment during sudden gusts.
How do I prevent the anchor rope from damaging my inflatable island?
Utilize a marine-grade bungee tether and protective rope sleeves to eliminate friction against the hull. Bungee tethers dissipate the energy of the water, preventing the rope from jerking against the reinforced D-rings. If the line must pass over an inflatable tube, a soft protective sleeve ensures the material remains pristine and free from unsightly surface abrasions or structural fatigue.
Should I anchor from one point or two points?
Two-point anchoring, often called a “bridle” setup, is superior for maintaining a fixed social position. By connecting your line to two separate D-rings, you distribute the tension evenly and prevent the island from swinging wildly in the wind. This dual-point connection creates a much more stable environment for guests to move between the island and the water with confidence.
What happens if the wind gets too strong for my anchor?
Retract your canopies immediately to reduce the “sail area” and increase your line scope to provide a more horizontal pull. If the wind speed doubles, the force on your island increases fourfold, which can overwhelm even the best setup. In extreme conditions, it’s safer to move your exclusive retreat to a sheltered cove or return to the dock to prevent equipment damage.
Is it better to anchor in deep or shallow water?
Deep water is generally better for stability because it allows for a proper scope ratio of 3:1 or 5:1. While shallow water feels more accessible for swimming, it often lacks the depth needed for the anchor to “set” correctly at a low angle. Always ensure the water is deep enough to avoid submerged rocks or debris that could puncture your inflatable party island.
Do I need a permit to anchor a floating island in a public lake?
Most jurisdictions don’t require permits for non-motorized inflatables, but you must verify local ordinances with the Department of Natural Resources. Some lakes have specific “no-anchor” zones or size restrictions for structures over 100 square feet. Understanding how to anchor a floating island in a lake also means respecting local maritime laws to ensure your social gathering remains uninterrupted and professional.