A single puncture doesn’t mark the end of your floating sanctuary; it’s simply a brief pause in your waterfront legacy. We understand that your premium floating deck is more than just equipment; it’s the centerpiece of your social life and a significant investment in your leisure time. When a leak occurs, the anxiety of permanent damage can be overwhelming. Learning how to repair a puncture in an inflatable platform with professional precision is the key to maintaining that sophisticated, high-end experience you’ve come to expect.
You want a restoration that’s so seamless it’s practically invisible, ensuring your platform retains its structural rigidity for high-pressure use. In this guide, we’ll show you how to identify even the most elusive leaks and apply the right adhesives for a permanent, factory-standard fix. We’ll cover everything from surface preparation to the final curing process, giving you the confidence to host your next gathering without a second thought about your gear’s integrity. By the time we’re finished, you’ll be ready to return to the water with the same prestige and excitement you felt on day one.
Key Takeaways
- Distinguish between natural atmospheric pressure fluctuations and genuine damage to ensure your luxury platform receives the precise care it requires.
- Understand the critical importance of marine-grade PVC adhesives in maintaining the structural rigidity necessary for high-pressure use on the water.
- Master the professional techniques for how to repair a puncture in an inflatable platform, ensuring a seamless restoration that preserves your asset’s aesthetic appeal.
- Identify the nuances of complex seam and valve repairs to prevent minor issues from compromising your next exclusive social gathering.
- Adopt sophisticated long-term maintenance habits, from UV protection to guest etiquette, to keep your waterfront social hub in pristine condition.
Identifying the Source of the Leak in Your Floating Sanctuary
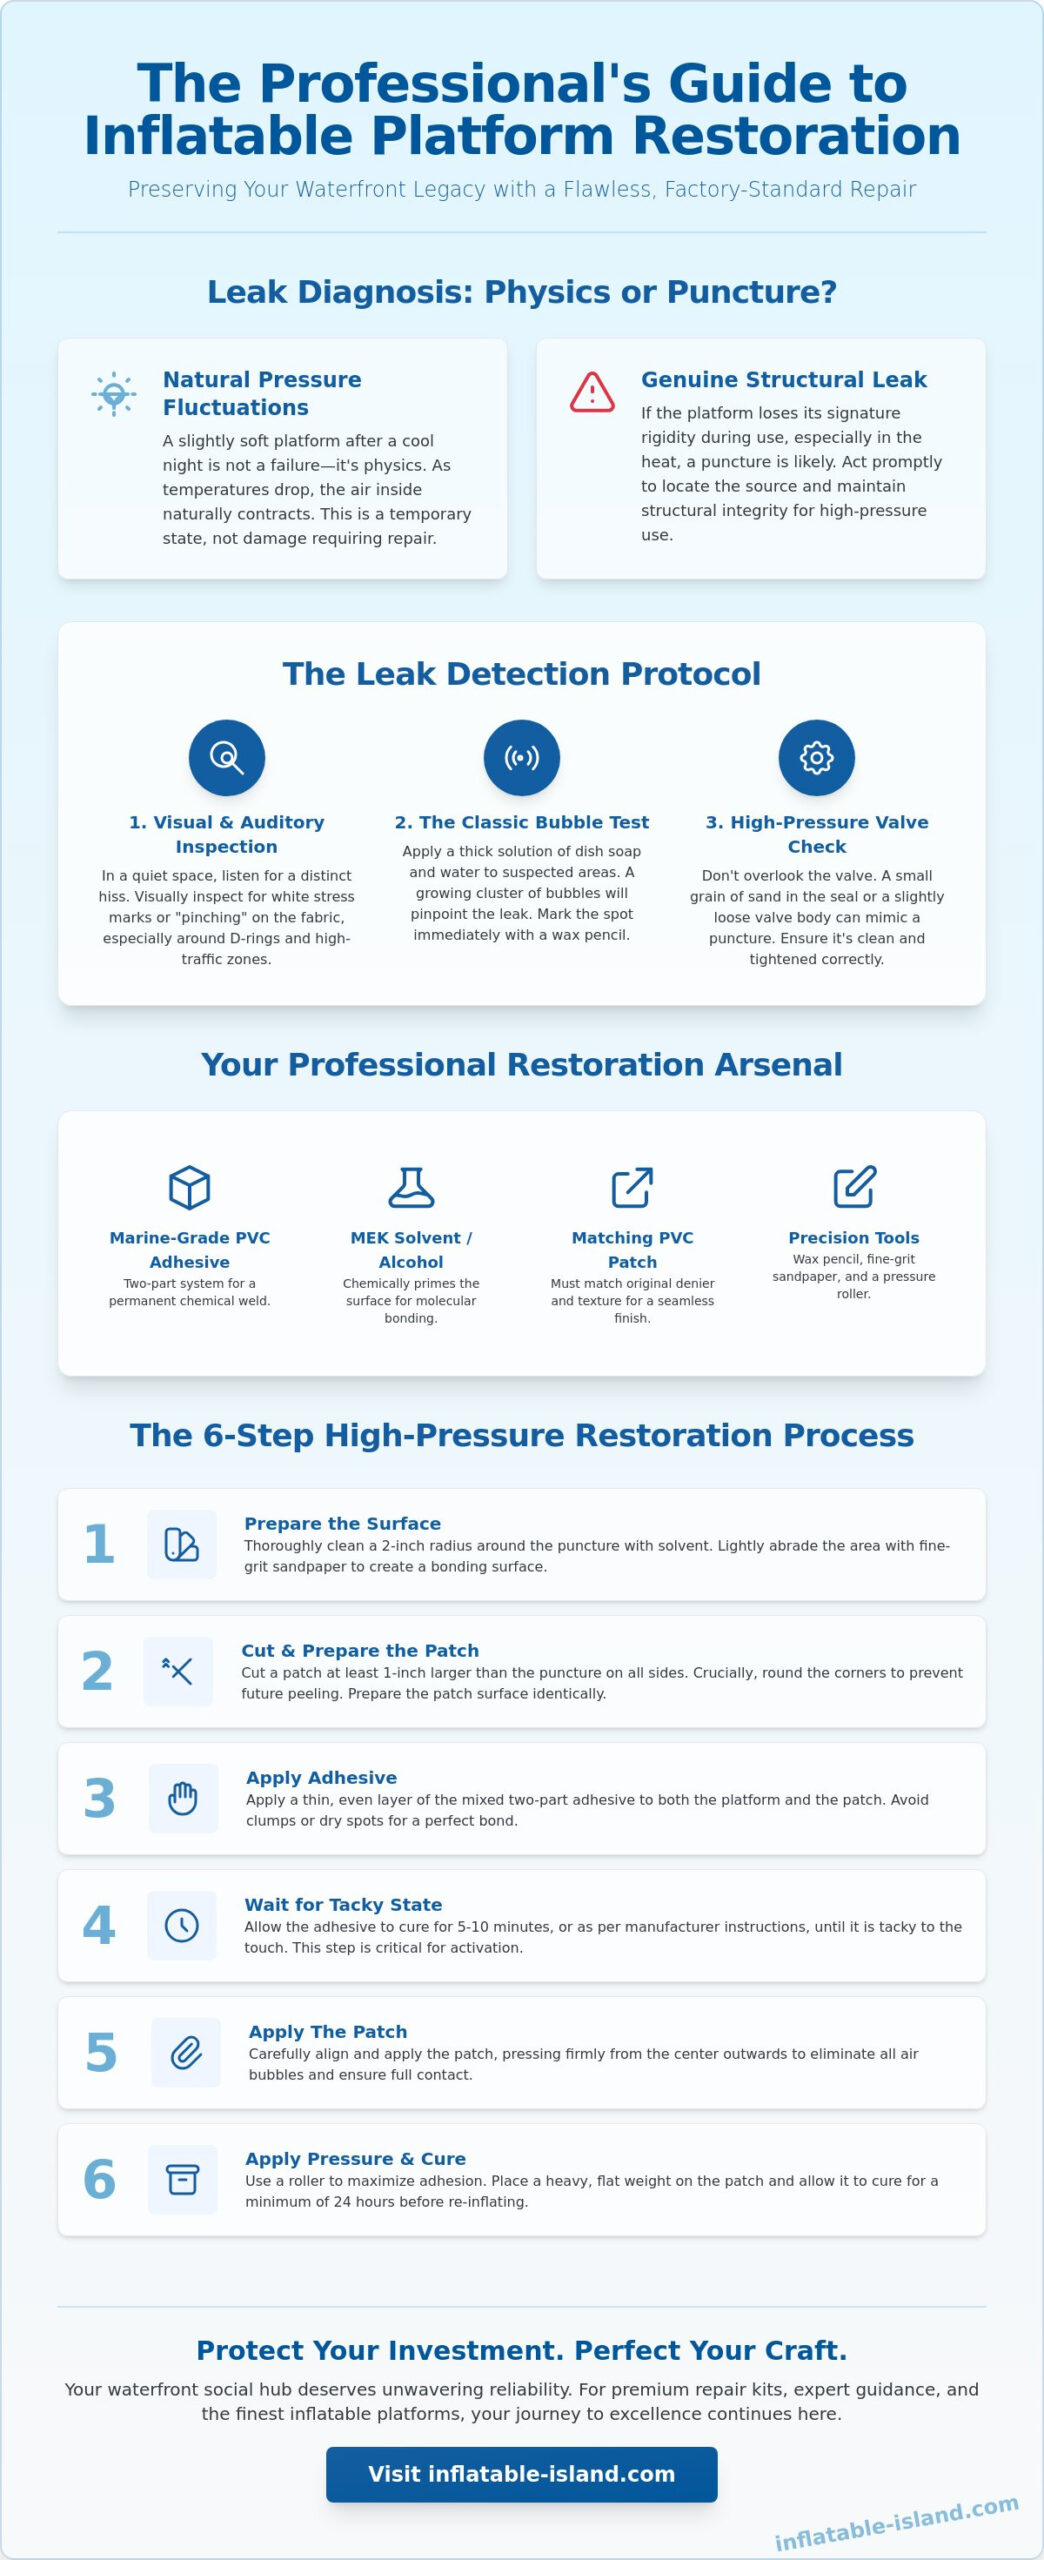
Don’t assume the worst if your platform feels slightly soft after a cool night on the water. Often, what appears to be a structural failure is merely the result of atmospheric pressure changes. When the sun sets and the water temperature drops, the air inside your inflatable floating decks naturally contracts. This isn’t a repair issue; it’s physics. However, if your platform loses its signature rigidity during the heat of a social gathering, you need to act. Understanding how to repair a puncture in an inflatable platform starts with a meticulous search for the source.
Mastering how to repair a puncture in an inflatable platform is an essential skill for any owner who values the longevity of their maritime investment. Premium platforms rely on advanced drop-stitch technology to maintain their flat, stable surfaces. This construction involves tens of thousands of polyester threads connecting the top and bottom layers, allowing for high-pressure inflation that mimics a hard deck. Because these platforms operate at a higher PSI than standard rafts, a leak can significantly impact the rock-solid stability your guests expect. Familiarity with Inflatable boat materials is essential, as the high internal tension can turn a tiny abrasion into a structural nuisance. Focus your search on high-traffic zones like the boarding edges, D-ring attachments, and the central social hubs where foot traffic is heaviest.
The Classic Bubble Test
To visualize the invisible, you need the right solution. Mix high-concentrate dish soap with a small amount of water to create a thick, sudsy coating. Use a soft sponge to apply this to suspected areas, paying close attention to the seams. When air escapes, it will create a growing cluster of bubbles, essentially singing its location to you. Once you’ve found the culprit, mark the spot with a wax pencil immediately. Don’t skip this step. Once the surface is dry, finding a pinhole-sized leak again is nearly impossible.
Visual and Auditory Inspection
Sometimes, the best tools are your own senses. Move the platform to a quiet environment and listen for a steady hiss. This is often more effective than a visual check for larger punctures. Inspect the fabric for “pinching” or white stress marks, which often occur if the platform was folded too tightly during transport. Finally, don’t overlook the high-pressure valve. A small grain of sand in the seal or a slightly loose valve body can mimic a puncture. For those managing a high-impact recreational business, these quick checks ensure your inventory stays in peak condition for every booking.
Curating Your Professional Restoration Arsenal
Don’t settle for hardware-store solutions when your luxury asset is on the line. Restoration is an art form that demands industrial-strength components. If you want to master how to repair a puncture in an inflatable platform, you must first source materials that match the original denier and texture of your deck. A premium repair kit is the foundation of this process, ensuring your waterfront hub remains the epitome of opulence. High-pressure inflatable floating decks require a bond that can withstand both intense UV exposure and the physical tension of a crowded social gathering.
Marine-grade PVC adhesive is non-negotiable for these sophisticated structures. Standard glues often fail under the intense heat and internal PSI of a summer afternoon. You need a bond that becomes part of the material itself, rather than just sitting on the surface. This level of reliability is what separates a temporary fix from a professional-grade restoration that preserves your investment for years to come.
Adhesives and Solvents
Choose a two-part adhesive for the most resilient results. While one-part glues are convenient for emergency field repairs, two-part systems use a hardening catalyst to create a chemical weld. Before applying any bond, the surface must be chemically primed. MEK (Methyl Ethyl Ketone) or high-purity alcohol removes manufacturing oils and slightly softens the PVC, allowing for true molecular bonding. Following official safety standards ensures your repair remains secure even in demanding maritime conditions. Always work in a well-ventilated space to maintain a professional and safe environment while using these potent solvents.
Hardware and Tools
Precision tools transform a messy patch into a seamless finish. Use 180-grit sandpaper to lightly abrade the repair zone, creating a mechanical key for the adhesive to grab. A heat gun or hairdryer is essential for activating the glue, but use it sparingly to avoid scorching the high-end fabric. Once the patch is applied, a weighted roller is your best friend. It exerts concentrated pressure to expel trapped air pockets, ensuring every square millimeter of the patch is fused to the deck. For those running a high-impact recreational business, having these tools organized and ready minimizes downtime and keeps your concierge offerings in pristine condition.
The Step-by-Step Restoration Process for High-Pressure Platforms
High-pressure environments demand a level of precision that standard inflatable repairs simply don’t address. When your platform operates at 10 to 15 PSI, the internal stress on a patch is immense. Mastering how to repair a puncture in an inflatable platform involves more than just covering a hole; it’s about restoring the structural integrity of your premium waterfront social hub. Every step must be executed with the same attention to detail used in the original manufacturing of your deck. Precision starts with the patch itself. Always cut your repair material into a circle or an oval. Rounded corners are essential because they lack the sharp points that catch on surfaces, which are the primary cause of premature peeling and failure.
Surface Preparation and Priming
Begin by deflating the platform completely. A rock-solid surface is impossible to patch correctly; you need a flat, relaxed “canvas” to ensure the adhesive bonds uniformly. Once the deck is flat, use your 180-grit sandpaper to lightly scuff the area around the puncture. You aren’t trying to sand through the material, but rather to create a textured surface for the adhesive to grip. After scuffing, perform a final solvent wipe with MEK or high-purity alcohol. This removes every trace of finger oils, dust, and scuffing debris. Referencing a step-by-step guide to patching an inflatable can help you visualize the necessary cleanliness required for a professional-grade molecular bond.
Adhesive Application and Bonding
We utilize the “Double-Coat” method to guarantee a permanent seal. Apply a thin, even layer of marine-grade adhesive to both the patch and the platform. Let this first layer sit for about five to ten minutes until it feels dry to the touch. Apply a second thin layer and wait for it to become “tacky.” You’ll know it’s ready when you can touch it with a knuckle and the glue doesn’t transfer to your skin. Align the patch carefully and press it down. Use a weighted roller, starting from the center and moving outward. This specific motion is vital to expel micro-bubbles that could expand and cause a failure once the platform is fully pressurized.
The Final Cure
Patience is the hallmark of a professional restoration. While it’s tempting to return to the water immediately, the 24-hour rule is non-negotiable for maritime safety. Place a smooth, heavy weight over the patch to maintain constant pressure during the curing process. Be mindful of your environment; high humidity can blush the adhesive and weaken the bond. Once the full day has passed, perform an initial pressure test by inflating the platform to only 2 PSI. Check the repair with soapy water one last time before bringing it up to its full operating pressure. For entrepreneurs managing a high-impact recreational business, this rigorous testing protocol is the key to maintaining a safe and reliable concierge offering.
Addressing Complex Leaks: Valves and Seams
Not every air loss is a simple hole in the fabric. While learning how to repair a puncture in an inflatable platform covers the basics, the true test of ownership lies in managing complex mechanical failures. These high-stress zones, specifically the valves and the bonded seams, are the pillars of your platform’s structural integrity. Addressing these requires a shift from simple patching to technical restoration. We believe that maintaining your elite floating retreat shouldn’t be a chore, but an exercise in preserving an unparalleled leisure-type experience.
The High-Pressure Valve Reset
Precision is paramount when dealing with the gateway to your platform’s rigidity. Use your valve wrench to ensure the internal and external components are perfectly aligned. Often, a perceived leak is simply a loose valve body caused by vibration during transport or extreme temperature swings. Unscrew the valve, clean the silicone gasket with fresh water to remove any micro-debris like sand or salt crystals, and re-tighten. If the internal spring has failed, a core replacement is a swift, five-minute fix that restores your platform’s high-pressure performance without the need for messy adhesives.
Reinforcing High-Stress Seams
Seams endure the highest tension, especially when your inflatable floating party island cabana boat is loaded with guests and gear. Look for signs of “unzipping,” where the edge tape begins to lift from the main body. This requires a “sandwich” patch, a technique where you apply material to both the interior and exterior of the seam to lock it in place. It’s a high-impact fix for any high-impact recreational business. For more on preserving these critical bonds and extending the life of your asset, check our guide on inflatable floating dock maintenance. Applying structural reinforcement patches to the corners can mitigate risk before a minor lift becomes a catastrophic failure.
There’s a fine line between a successful DIY restoration and a job for the experts. If you encounter internal drop-stitch failures, identifiable by a localized bulge or a “pinging” sound when under pressure, stop immediately. These internal polyester threads are the backbone of your deck’s flat surface. Attempting to fix internal structural threads without factory-grade equipment can lead to a loss of the rock-solid stability your guests expect. We recommend consulting specialists when a seam split exceeds two inches or when the internal architecture is compromised. For entrepreneurs ready to scale their fleet and start selling party experiences, knowing when to call in the professionals is a hallmark of business reliability and visionary leadership.
Protecting Your Investment: Long-Term Maintenance for Inflatable Islands
Preserving the pristine condition of your waterfront retreat is about more than just reactive fixes. While you’ve mastered how to repair a puncture in an inflatable platform, a proactive maintenance philosophy ensures your island remains the epitome of opulence for years to come. Think of your platform as a premium personal retreat that requires a concierge level of care to combat the harsh elements of the maritime environment. By treating your floating deck with the same respect as a high-end yacht, you ensure it remains the centerpiece of your social life season after season.
UV radiation is the primary antagonist of high-quality PVC. Over time, constant sun exposure can lead to material degradation, making the fabric brittle and prone to the very leaks you’ve learned to fix. Applying a specialized UV-protectant spray twice a season acts as a high-performance shield. This simple step maintains the material’s suppleness and keeps the colors vibrant, ensuring your island always looks brand new when guests arrive. It’s a small investment that yields a significant return in perceived value and structural longevity.
The Post-Adventure Ritual
Every excursion should end with a dedicated cleaning routine. Freshwater rinsing is essential, as salt crystals and chlorine residues are surprisingly corrosive over time. After rinsing, use a soft cloth to dry the surface completely. Never fold your platform while it’s damp. Moisture trapped in the folds is an invitation for mold and mildew, which can ruin the aesthetic and the scent of your luxury space. For those managing a high-impact recreational business, this ritual is the key to maintaining a guilt-free luxury experience for every client.
Smart Socializing on the Water
Setting “Island Rules” for your guests isn’t just practical; it’s part of the exclusive experience. Encourage your circle to leave sharp jewelry and traditional glassware on the main vessel. High-end acrylics and soft-soled footwear are the preferred choices for maintaining a puncture-free environment. If you’re hosting four-legged explorers, utilize protective mats in high-traffic zones to safeguard the surface against claws. For more tips on hosting the perfect event, explore The Ultimate Inflatable Floating Party Island Cabana Guide. Finally, remember that storage matters. Avoid tight, sharp folds that create stress points. Utilize a loose roll technique to preserve the internal drop-stitch architecture and keep your platform ready for its next high-pressure adventure.
Secure Your Waterfront Legacy
Your journey into the art of restoration ensures that your premium platform remains a beacon of luxury on the water. By mastering the precision of rounded patches and the science of molecular bonding, you’ve moved beyond simple maintenance into the realm of visionary asset management. You now possess the specialized knowledge of how to repair a puncture in an inflatable platform, ensuring that a minor incident never compromises the structural rigidity or the sophisticated aesthetic of your floating deck.
We stand behind every owner with expert support and a legacy of quality. Our products feature commercial-grade drop-stitch PVC construction specifically designed for sophisticated social gatherings. Whether you’re hosting an exclusive sunset party or scaling a high-impact recreational business, our commitment to your success is unwavering. Explore our premium Inflatable Floating Decks and Party Islands to discover the next level of water-based entertainment.
Return to the water with absolute confidence. Your next unforgettable adventure is just one inflation away.
Frequently Asked Questions
How long does a patch need to dry before I can put my platform back in the water?
You must allow the adhesive to cure for a full 24 hours before returning to the water. While the patch might feel dry to the touch within minutes, the molecular bond requires a complete day to reach the strength necessary to withstand high internal PSI. This patience ensures your unparalleled leisure-type experience remains uninterrupted by a recurring failure during a social gathering.
Can I use super glue or duct tape for a quick fix on my inflatable island?
Avoid using super glue or duct tape as they are entirely unsuitable for the flexible, high-pressure nature of marine-grade PVC. Super glue becomes brittle and will crack under tension, while duct tape leaves a sticky residue that complicates a professional restoration later. Always use the specialized marine-grade adhesive included in your premium repair kit to maintain the epitome of opulence your deck represents.
What is the best way to find a tiny pinhole leak that I can only hear but not see?
The most effective method is applying a high-concentrate soapy water solution to the suspected area with a soft sponge. Even if the hole is invisible to the naked eye, the escaping air will create a cluster of visible bubbles that pinpoint the exact exit point. This technique is the gold standard for those learning how to repair a puncture in an inflatable platform with professional accuracy.
Is it possible to repair a leak that is located right on the seam of the platform?
Yes, seam repairs are possible but require a more advanced “sandwich” patching technique for maximum security. You’ll need to apply a patch that extends at least two inches beyond the edges of the leak to provide essential structural reinforcement. Because seams are high-stress zones, ensuring a perfect bond is critical for maintaining the structural rigidity of your inflatable floating decks during group gatherings.
Do I need to deflate my platform entirely before applying a patch?
Deflating the platform entirely is a non-negotiable step for a successful and lasting repair. You need a flat, relaxed canvas to apply even pressure and ensure the adhesive layers fuse correctly without interference. Attempting to patch a pressurized deck will result in air pushing through the wet glue, creating micro-channels that lead to immediate failure once you return to the water.
Can I repair my inflatable floating deck while it is still on the water?
Professional repairs cannot be performed while the platform is on the water. The repair zone must be 100% dry and free from all moisture to achieve a factory-standard molecular bond. Water contamination will cause the adhesive to fail, so always move your platform to a stable, dry, and well-ventilated environment before beginning the restoration process for how to repair a puncture in an inflatable platform.
What should I do if the valve itself is leaking air?
Start by using a valve wrench to ensure the valve body is properly tightened against the internal flange. If air still escapes, unscrew the valve to clean the silicone gasket of any sand or salt crystals that might be preventing a perfect closure. A quick cleaning or a simple valve core replacement often resolves the issue in under five minutes without needing a fabric patch.
Does repairing a puncture myself void the warranty on my Inflatable Islands Co. product?
Performing a standard puncture repair following our professional guidelines typically doesn’t void your warranty. We encourage our owners to take pride in the maintenance of their assets to ensure their high-impact recreational business remains profitable and safe. However, if you’re facing a complex structural issue or an internal drop-stitch failure, it’s best to contact the concierge support team at Inflatable Islands Co. for guidance before proceeding.